Food Photography 101: Tossing a salad

This is part of a series of posts on food photography, sharing some of the tips and tricks we use here at The Times. We received a number of great questions from readers, which we will answer in upcoming posts.
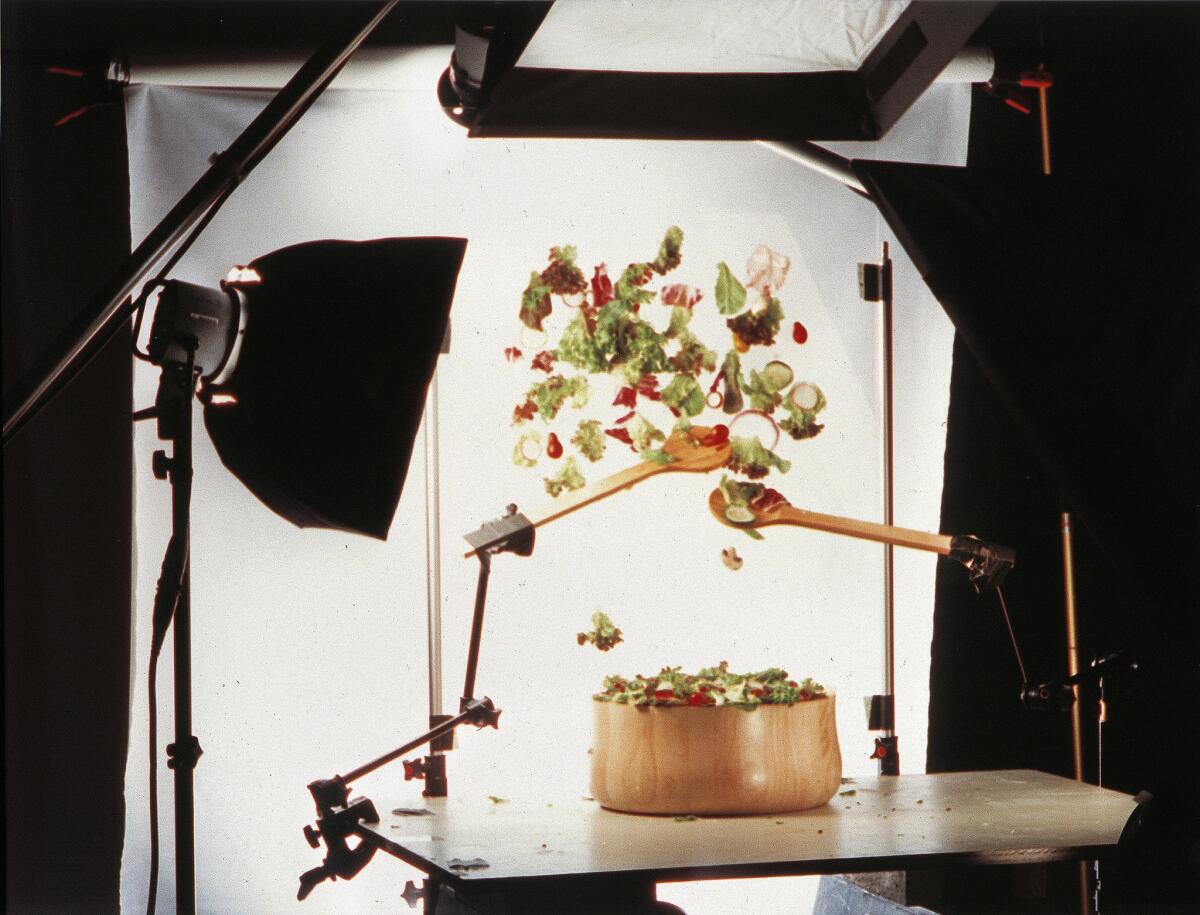
In the photo gallery above, photographer Kirk McKoy illustrates how he was able to achieve a great shot of the act of tossing a salad. Continue reading below to learn how he constructed the shot, along with some general tips. -- Noelle Carter
The perfect toss
A perfect tossed salad with fresh, colorful greens and vegetables can be a beautiful display of crisp, vibrant colors. But photographing a perfectly made salad can be a complete beast. I was given the task of photographing a salad and wanted to create something that looked so tasty that the viewer would want to eat the paper it was printed on.
While I wanted to display all of the vibrant colors and shapes of the greens, I also sought to illustrate the freshness and sheer lightness of the delicate dish. In short, I wanted the perfect toss.
I started by drawing a quick sketch of what I thought the salad should look like. The placement of the tongs was key to giving the feel that this salad had just been tossed by a master chef.
Initially, I had Test Kitchen staffers toss the salad as I shot the action; however, I could not control the placement of the greens, which posed a problem (not to mention that I couldn’t get a clean shot of the salad without part of the chef in the background).
I quickly decided this would work better as a still-life photo, so I could control the placement of the greens and tongs. Here’s a quick step-by-step of what I did to create the illusion of a tossed salad:
- I taped a clear sheet of 4-by-6-foot Plexiglas to two light stands.
- I set up a roll of white paper as the background.
- I placed a table in the foreground to hold the bowl of salad.
- I taped salad tongs in place, using articulated arms (the arms I used are from Manfrotto Bogen).
- Because of the moist, porous texture of the greens, I could not glue or tape them to the Plexiglas. It took some brainstorming, but I figured out I could use clear museum wax to stick straight pins to the Plexiglas. I pierced the greens onto the straight pins to get them to stay in place.
- Adding some lights, I was ready to shoot.
Even with all the preparation, I still wasn’t happy with the first few shots. The salad, with everything frozen in place, looked too artificial. I decided to slow the shutter speed of the camera, and had a Test Kitchen staff member sprinkle some greens in the space between the back of the clear Plexiglas and the white background to add a sense of motion to the tossed greens in the finished shot. It worked perfectly!
Questions or suggestions? Food photography challenge? Comment below or email Noelle Carter at [email protected].
ALSO:
Go behind the scenes at the Test Kitchen
Browse hundreds of recipes from the L.A. Times Test Kitchen
Food photography 101: Using utensils and equipment as props
More to Read
Eat your way across L.A.
Get our weekly Tasting Notes newsletter for reviews, news and more.
You may occasionally receive promotional content from the Los Angeles Times.


